 Save to Pinterest
 I'll never forget the moment I realized that negative space could be just as delicious as the food itself. It was at a gallery opening in Barcelona where a friend served the most stunning platter I'd ever seen—cheeses, fruits, and cracers arranged so cleverly that the empty spaces formed a perfect star. Guests literally gasped before tasting anything. That night, I became obsessed with the idea that food could be art, and art could be edible. Now, whenever I create this platter, I'm transported back to that moment of pure creative joy.
I made this for my sister's engagement party, spelling out her new initials in negative space with a scatter of rose petals around it. When she walked in and realized what the platter said, she cried happy tears right there in the kitchen. It taught me that the most memorable meals aren't always about complicated recipes—sometimes it's about the thought and intention you pour into the presentation.
Ingredients
- Brie cheese, sliced (100g): This creamy, buttery cheese becomes even more luxurious when thin-sliced and arranged thoughtfully. The key is to slice it just before arranging so it stays fresh and doesn't separate.
- Manchego cheese, sliced (100g): I love this Spanish cheese for its slight nuttiness and firm structure—it holds its shape beautifully on the platter without crumbling unexpectedly.
- Goat cheese, crumbled (100g): The tangy brightness of goat cheese creates wonderful flavor contrast and its crumbly texture fills small gaps perfectly while adding visual interest.
- Seedless red grapes (1 cup): These are your round jewels—their uniform size makes them ideal for creating clean lines and circles within your design. The sweetness balances salty elements.
- Strawberries, halved (1 cup): These should be perfectly ripe and at room temperature for maximum flavor. Halving them creates nice visual geometry and prevents them from dominating your space.
- Kiwi, sliced (1): The bright green rings provide unexpected color pops and their slight tartness is a pleasant surprise for guests expecting purely sweet fruit.
- Blueberries (1/2 cup): These tiny orbs are your secret weapon for filling micro-gaps and creating texture. They roll less than you'd think if arranged on slightly sticky surfaces.
- Thin crackers (12): Choose ones with visual appeal—I prefer seeded or herb varieties that add another layer of detail to your design.
- Roasted almonds (1/2 cup): The roasting brings out natural oils and flavor. Their angular shape provides wonderful contrast to all the round fruits and creates helpful texture anchors.
- Green olives, pitted (1/4 cup): These add a savory depth and their dark color creates striking contrast against lighter ingredients.
- Fresh mint leaves: Beyond decoration, these add a hint of freshness when guests bite through. Choose unblemished leaves for your border or negative space edges.
- Edible flowers (optional): Pansies and violas are my favorites—they're food-safe and add an almost magical finishing touch that makes guests feel like they've stumbled onto something truly special.
Tired of Takeout? 🥡
Get 10 meals you can make faster than delivery arrives. Seriously.
One email. No spam. Unsubscribe anytime.
Instructions
- Sketch Your Vision:
- Choose a shape that excites you—a star, a heart, initials, a seasonal motif. Sketch it lightly on parchment paper, making sure it fits comfortably with at least two inches from your platter edges. The sketch doesn't need to be perfect; it's just your guide.
- Create Your Template:
- Gently place the parchment on your serving platter, positioning it so you can see your design clearly through the arrangement you're about to build. Smooth out any wrinkles.
- Build Your Base Clusters:
- Start arranging cheeses and crackers in small clusters around your negative space outline. Think of them as anchors. Group similar items together—create a small cheese cluster here, a cracker cluster there. This gives you visual rhythm and makes the negative space feel intentional rather than empty.
- Fill with Fruit Precision:
- Now comes the meditative part. Begin filling gaps with fruit, working slowly and deliberately. Arrange grapes in gentle curves that respect your shape. Place strawberry halves like they're pieces of a puzzle. As you work, step back occasionally to see how the negative space is forming.
- Add Texture and Depth:
- Scatter almonds and olives in small piles, varying their heights slightly. These create visual interest and help define your negative space boundaries. The different sizes and shapes draw the eye in interesting ways.
- Reveal Your Masterpiece:
- This is the magical moment. Gently lift one corner of the parchment and carefully peel it away. You'll see the clean, precise outline of your design emerge. Take a breath—it's always more beautiful than you imagined in this moment.
- Final Flourishes:
- Arrange mint leaves and edible flowers along the edges of your negative space or scattered throughout for freshness and elegance. These finishing touches feel like signing your artwork.
- Present with Pride:
- Bring your platter out and let your guests admire it before the first person reaches for food. Encourage them to notice the intentionality in every placement. Then, as the platter empties, your beautiful negative space gradually fills in, and that's perfect too.
 Save to Pinterest
 The most beautiful moment came when a young guest asked if he could eat just around the edges to keep the star intact as long as possible. His mom laughed, saying no one had ever wanted to preserve a platter before. But that's when I understood—this recipe works because it gives people permission to see food as something worth preserving, photographing, admiring. The eating comes later. That shift in perspective is magic.
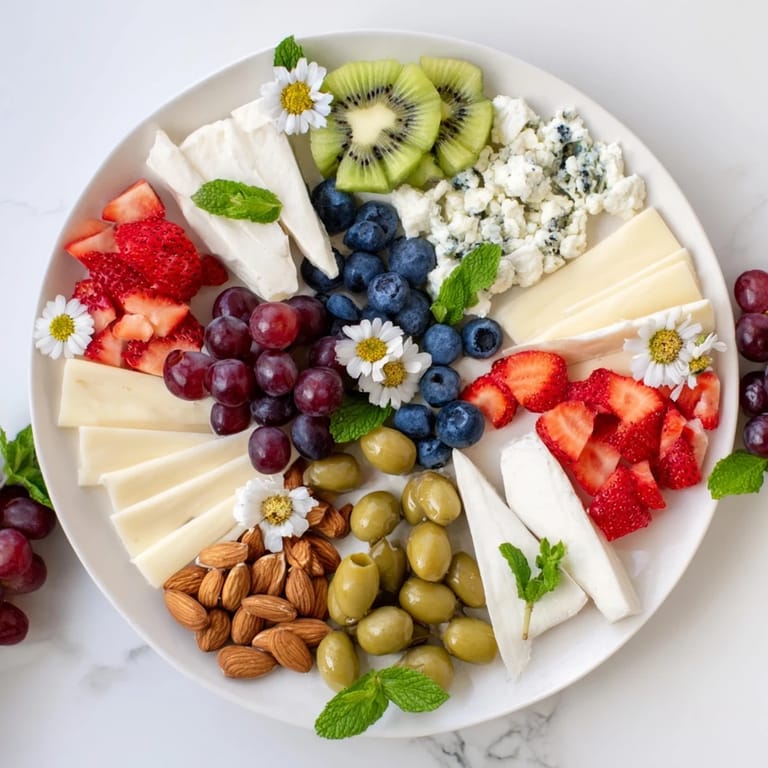
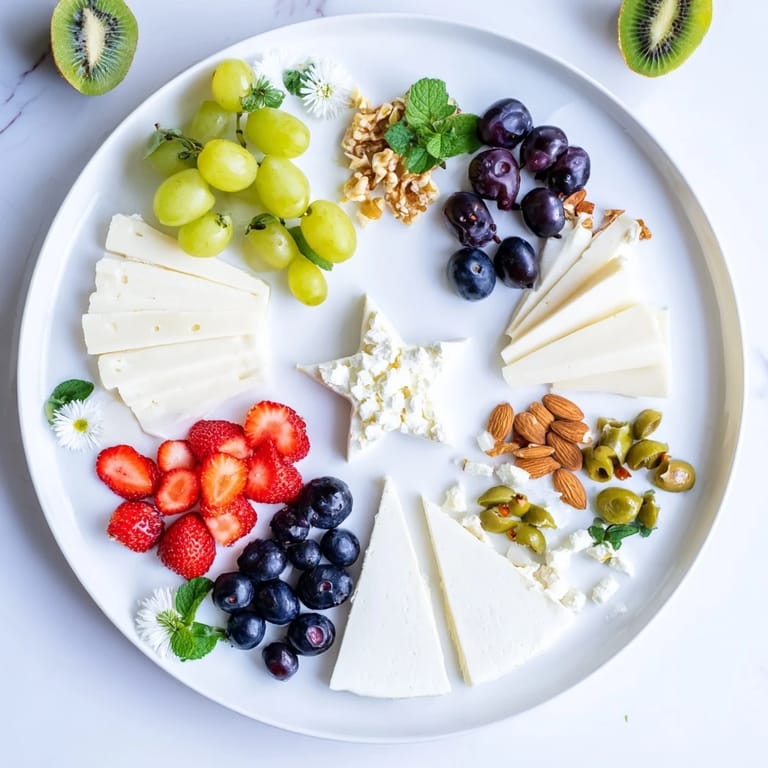
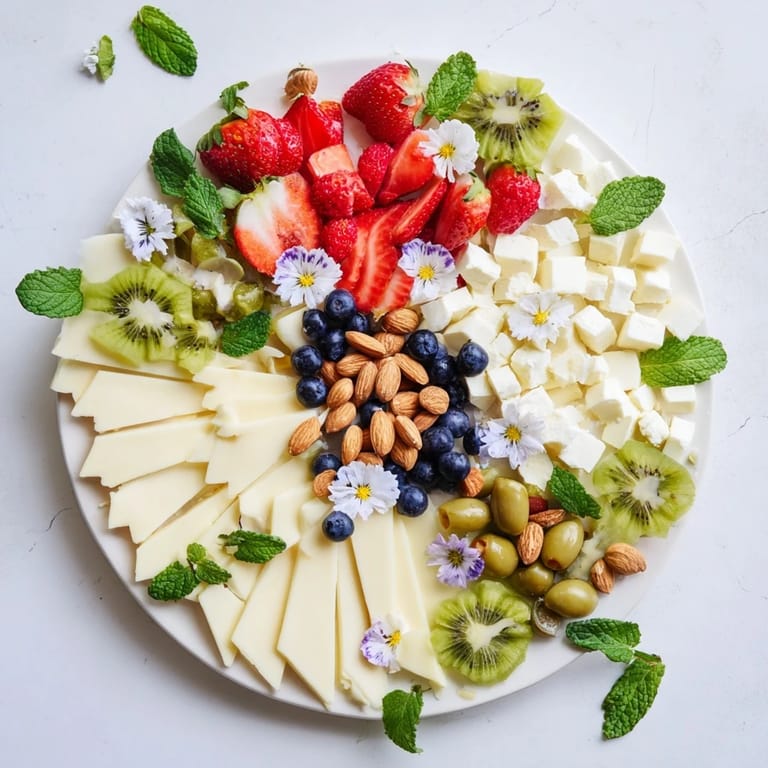
The Art of Negative Space Design
Negative space is a concept borrowed from visual art, and it works exactly the same way on a food platter. Your eye is naturally drawn to the empty shapes as much as the full ones—sometimes more. When I first started making these platters, I thought emptiness meant failure, like I'd forgotten to arrange something. But the opposite is true. That star-shaped void surrounded by cheeses and fruit is where the magic lives. The contrast between the full and the empty makes both more beautiful.
Adapting for Your Celebration
This platter is endlessly adaptable, which is why I keep returning to it. For a dessert version, I replace the cheeses with dark chocolate squares, the crackers with biscotti, and add dried apricots and figs instead of fresh berries. For winter celebrations, I've created snowflakes with white cheeses and blue fruits. For weddings, I spell out initials. The template stays the same; only the ingredients change. What matters is that you're creating something uniquely yours.
Timing and Temperature Tips
This platter's magic lies in its simplicity, but a few small timing choices make all the difference between good and unforgettable. I always assemble within an hour of serving because fruit releases moisture and cheeses can weep in warm kitchens, making precise lines blur. If your kitchen is warm, keep ingredients in the refrigerator until the final 15 minutes. The crackers should be at room temperature—cold ones feel hard and unwelcoming to guests. And here's a trick I learned by accident: if you're serving this outside or in a warm room, place a slightly damp kitchen towel under the platter (not touching the food) to keep it from sliding around while you're arranging.
- Arrange your platter no more than 45 minutes before serving for maximum visual impact and fresh flavors.
- Keep a small damp cloth nearby while arranging—if you make a placement mistake, you can gently wipe away small crumbs without affecting the larger arrangement.
- If building ahead, loosely cover with plastic wrap and refrigerate, then remove 10 minutes before guests arrive to let everything reach the perfect temperature.
 Save to Pinterest
 Every time I make this platter, I'm reminded that cooking isn't just about feeding people—it's about creating moments. This recipe gives you permission to slow down and be intentional with every placement, to make something that nourishes both the stomach and the soul.
Questions & Answers
- → What is negative space in food presentation?
Negative space refers to the intentional empty areas within a platter that create visually striking shapes or motifs when surrounded by carefully arranged ingredients.
- → How do I create the negative shapes accurately?
Sketch your desired shape on parchment paper, place it on the platter as a guide, and arrange cheeses, crackers, and fruits around it, then remove the paper carefully.
- → Can this platter be adapted for dietary restrictions?
Yes, for gluten-free options, use gluten-free crackers and consider substituting cheeses with plant-based alternatives if needed.
- → What types of ingredients work best for texture contrast?
A mix of soft cheeses, crunchy crackers, fresh fruits, nuts, and savory olives adds varied textures and vibrant colors to enhance the visual appeal.
- → How long does it take to assemble this platter?
Preparation takes around 40 minutes, mainly for arranging ingredients carefully to achieve the negative space design.
- → Can this presentation be used for desserts?
Yes, replace cheeses and crackers with chocolates, biscotti, and dried fruits to create a dessert version with similar visual impact.