 Save to Pinterest
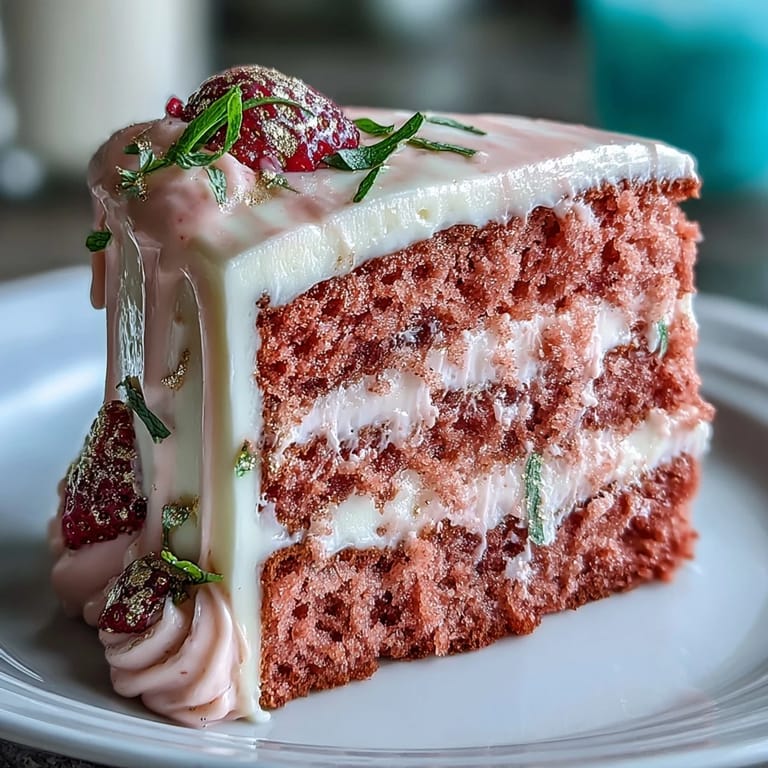
 The first time the blush pink layers of this cake came to life in my kitchen, my counters looked like a modern art project and my playlist fizzed with excitement. It was one of those afternoons where the promise of a celebration lingered in the air, and the subtle aroma of rosé had me humming along while I worked. There’s something joyful about transforming wine and flour into something meant for sharing—a cake that demands a little ceremony. I didn’t expect the gold drip to evoke so many oohs and ahhs, but it truly is a crowning touch. Whether you’re marking a once-in-a-lifetime day or just celebrating a favorite friend, this cake insists that joy can be edible.
One March morning, I whipped up this cake for my cousin’s bridal shower, letting laughter bounce around the room as my niece ‘taste-tested’ the frosting with her fingers. I still remember the streak of pink food gel that found its way onto the dog’s ear, and the kitchen filling with both anticipation and sweet, floral scents as the layers cooled on the wire racks. Everything felt a little more hopeful, as if each component was cheering for the big day ahead.
Ingredients
- All-purpose flour: Use a kitchen scale, if you have one, for accuracy—it ensures the tenderest crumb.
- Granulated sugar: Lends essential sweetness and helps give the cake a fine texture.
- Baking soda & baking powder: Both are needed for the right lift; don’t skimp or swap one for the other.
- Salt: Just a pinch sharpens all those delicate flavors.
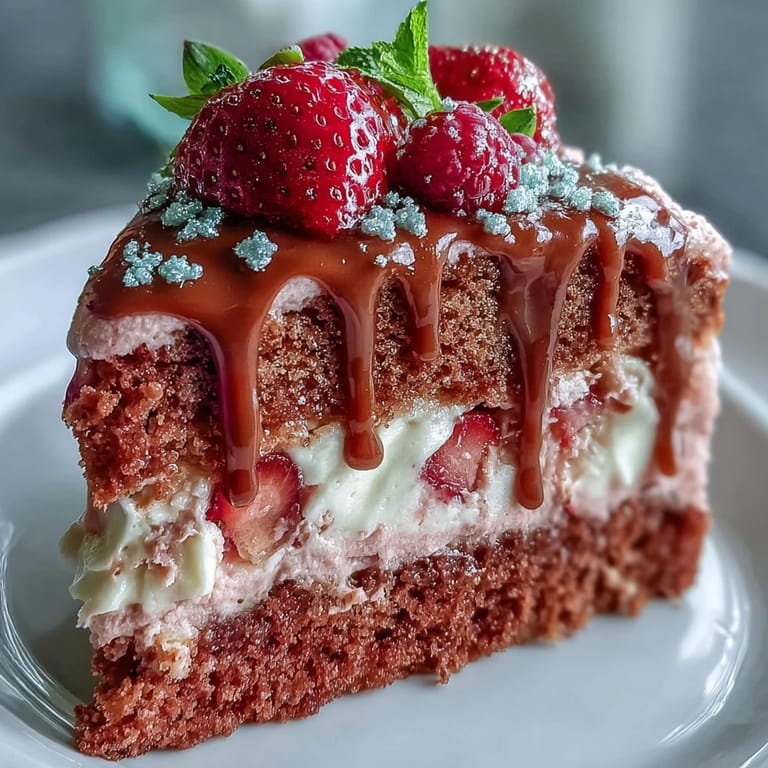
- Unsweetened cocoa powder: Adds a faint chocolate whisper and boosts the rosy hue—use Dutch process for smoothest results.
- Unsalted butter: Soften it fully; cold butter makes for dense, stubborn batter.
- Buttermilk: Room temperature is key; cold buttermilk can curdle your batter before you even bake.
- Rosé wine: Choose a dry one you’d happily sip to keep flavors bright, not too sweet.
- Eggs: Let them sit out so they blend in smoothly—no streaky batter here.
- Vanilla extract: Even with rosé, vanilla rounds out the flavor and adds warmth.
- White vinegar: Reacts with the baking soda for lovely lift and a subtle tang.
- Pink food coloring gel: Use gel for vibrant color without watering down the batter.
- Cream cheese: Softened to avoid lumpy frosting; trust me, it’s worth the patience.
- Powdered sugar: Sifted to keep your frosting cloudlike and smooth.
- White chocolate chips: Melts easily for the gold drip; stir gently to keep it silky.
- Heavy cream: The secret for a luscious drip effect that sets just right.
- Edible gold luster dust: Transforms a homemade cake into a full-on centerpiece.
- Vodka or clear extract: Needed for painting the luster—evaporates fast, leaving only sparkle.
Tired of Takeout? 🥡
Get 10 meals you can make faster than delivery arrives. Seriously.
One email. No spam. Unsubscribe anytime.
Instructions
- Get Set Up:
- Line and grease your pans then start the oven so the baking can happen without delay—no panicking over sticky cakes later.
- Mix Your Dry Ingredients:
- Sift flour, cocoa, leaveners, and salt into a fluffy mound; lifting the bowl, I always inhale the faint scent of cocoa and imagine the final blush layers.
- Beat the Butter and Sugar:
- Let the mixer whip until almost white and airy, scraping the bowl so every bit is included; the sound means you’re building the cake’s foundation.
- Add Eggs and Vanilla:
- Pop the eggs in one by one while mixing on low, then swirl in vanilla for fragrance; it’s a little moment of calm as things start to come together.
- Incorporate Wet and Dry Mixes:
- Alternate the buttermilk and rosé with the dry ingredients, beating until just combined; over-mixing is where sadness happens, so stop as soon as the flour vanishes.
- Tint the Batter:
- Stir in pink food gel a scant drop at a time; a tiny bit goes a long way, and you can always add more.
- Bake the Cakes:
- Evenly pour the batter into your pans, give them a tiny tap to release bubbles, and bake until domes form and a toothpick tests clean.
- Cool Completely:
- Let cakes rest in their pans for ten minutes before turning out; they finish setting and become easier to frost.
- Make the Frosting:
- Whip butter and cream cheese until dreamy, add powdered sugar in clouds, then splash in rosé and vanilla until it’s delicately pink and fluffy.
- Layer and Crumb Coat:
- Trim cake domes if needed, sandwich with frosting, then smooth a thin layer all over to lock in crumbs; chill so the final frosting stays flawless.
- Finish Frosting:
- Apply the last swirl of frosting and let the cake chill again so everything holds up for the gold drip.
- Gold Drip Time:
- Melt white chocolate and cream, cool, then use a spoon or bottle to coax drips over the cake edge—expect a little mess and a lot of fun.
- Paint the Gold:
- Mix edible luster dust and vodka, paint the set drips with a tiny brush, and marvel at the transformation as the shimmer appears.
- Final Chill and Serve:
- Chill the masterpiece one last time so every slice cuts cleanly and let the anticipation build before you reveal it.
 Save to Pinterest
  Save to Pinterest
 When the first slice finally slid onto a plate, dainty pink layers aglow beneath the gold, I heard someone gasp in delight—right there the cake became more than just dessert, it was a joyful memory in the making. I love how it felt like a gift to everyone gathered, not just the bride-to-be.
On Picking Your Rosé
Not all rosé wines are created equal for baking, and after testing a few, I found that a dry, floral bottle gives the cake a sophisticated, subtle note without overpowering it. A sweet or heavy-handed rosé can make things cloying, so stick to one you’d enjoy chilling in a glass for a summer afternoon.
How to Ace the Gold Drip
I learned the hard way that temperature is everything for that perfect drip; if the chocolate is too hot, it runs wild, but too cold and it plops instead of flowing. It’s best to test a single drip on the cake edge first before committing to the cascade, adjusting the consistency with a drop of cream if needed.
Assembly Secrets: Getting the Layers Just Right
I used to get impatient and stack layers while still a little warm, which always led to lopsided results and melting frosting. Instead, letting everything chill and using an offset spatula for those crisp, swooping lines makes all the difference.
- Keep parchment rounds under your cake for a fuss-free clean up.
- Save a handful of edible flowers or berries for a surprise garnish.
- Have extra frosting on hand in case a tiny rescue is needed before the gold paint.
 Save to Pinterest
  Save to Pinterest
 Wishing you plenty of laughter and a little shimmer as you create this cake—it’s really about the joy (and maybe a few gold fingerprints left behind). Happy celebrating!
Questions & Answers
- → Can I make this alcohol-free?
Yes. Substitute the rosé with an equal amount of sparkling grape juice or a non-alcoholic rosé alternative. Brushing layers with the non-alcoholic liquid adds moisture and maintains the intended flavor profile.
- → How do I get an even blush-pink color?
Use concentrated gel food coloring and add a little at a time until you reach the desired shade. Gel gives vibrant color without changing batter consistency; mix gently to avoid deflating the batter.
- → How do I keep the cream cheese frosting stable?
Ensure butter and cream cheese are evenly softened, beat until smooth, and add powdered sugar gradually. Chill the frosting briefly before piping or assembling to firm it, and avoid overbeating to prevent a runny texture.
- → What's the best way to make and apply the gold drip?
Warm white chocolate with heavy cream in short intervals until smooth, then cool to a pourable but not hot temperature. Apply drips with a spoon or squeeze bottle, let set, and mix luster dust with vodka or clear extract to paint the drip for a metallic finish.
- → How should I store and transport the finished cake?
Chill the cake covered in a cake box or on a cake board to protect decorations. For transport, secure the cake in a low-temperature insulated box and keep it flat. Store in the refrigerator; remove 20–30 minutes before serving if you prefer it closer to room temperature.
- → Can I prepare layers ahead of time?
Yes. Bake and cool the layers, then wrap tightly and refrigerate up to 48 hours or freeze up to one month. Thaw in the fridge before leveling, filling, and decorating for best results.